Create a Fungible Token
- CKB dev environment: OffCKB (≥v0.4.0)
- JavaScript SDK: CCC (≥v0.0.14-alpha.0)
Tutorial Overview
Unlike ERC20(Ethereum) and BRC20(Bitcoin), CKB uses a unique way to build custom tokens based on its UTXO-like Cell Model.
In CKB, custom tokens are called User-Defined Tokens (UDTs). CKB defines a minimal standard for UDTs called xUDT(extensible UDT). In this tutorial, you will learn how to issue custom tokens using the pre-deployed xUDT Script.
Steps to Issue a Custom Token with xUDT:
- Create a Special Cell: When you issue tokens, you create a special Cell representing a balance of your custom token, similar to how physical cash represents a balance of currency.
- Configure the Cell's Data: This Cell’s data field will store the token amount, while its Type Script will be the xUDT Script. The script’s args field will contain the Lock Script Hash of the issuer.
- Establish a Unique Token ID: The issuer’s Lock Script hash serves as the unique identifier for each custom token. Different Lock Script hashes represent different tokens, enabling secure and distinct transactions for each token type.
While xUDT includes more advanced features, this tutorial focuses on its core concept. For more details on xUDT’s capabilities, you can explore the full xUDT spec.
Setup Devnet & Run Example
Step 1: Download the Source Code
To get started with the tutorial dApp, clone the repository and navigate to the appropriate directory:
git clone https://github.com/nervosnetwork/docs.nervos.org.git --depth 1
cd docs.nervos.org/examples/dApp/xudt
You can also read the full code online or download it here.
Step 2: Start the Devnet
To interact with the dApp, ensure that your Devnet is up and running. After installing @offckb/cli, open a terminal and start the Devnet with the following command:
- Command
- Response
offckb node
Launching CKB devnet Node...
CKB devnet RPC Proxy server running on http://127.0.0.1:28114
You might want to check pre-funded accounts and copy private keys for later use. Open another terminal and execute:
- Command
- Response
offckb accounts
Print account list, each account is funded with 42_000_000_00000000 capacity in the genesis block.
[
  {
    privkey: '0x6109170b275a09ad54877b82f7d9930f88cab5717d484fb4741ae9d1dd078cd6',
    pubkey: '0x02025fa7b61b2365aa459807b84df065f1949d58c0ae590ff22dd2595157bffefa',
    lockScript: {
      codeHash: '0x9bd7e06f3ecf4be0f2fcd2188b23f1b9fcc88e5d4b65a8637b17723bbda3cce8',
      hashType: 'type',
      args: '0x8e42b1999f265a0078503c4acec4d5e134534297'
    },
    address: 'ckt1qzda0cr08m85hc8jlnfp3zer7xulejywt49kt2rr0vthywaa50xwsqvwg2cen8extgq8s5puft8vf40px3f599cytcyd8',
    args: '0x8e42b1999f265a0078503c4acec4d5e134534297'
  },
  {
    privkey: '0x9f315d5a9618a39fdc487c7a67a8581d40b045bd7a42d83648ca80ef3b2cb4a1',
    pubkey: '0x026efa0579f09cc7c1129b78544f70098c90b2ab155c10746316f945829c034a2d',
    lockScript: {
      codeHash: '0x9bd7e06f3ecf4be0f2fcd2188b23f1b9fcc88e5d4b65a8637b17723bbda3cce8',
      hashType: 'type',
      args: '0x758d311c8483e0602dfad7b69d9053e3f917457d'
    },
    address: 'ckt1qzda0cr08m85hc8jlnfp3zer7xulejywt49kt2rr0vthywaa50xwsqt435c3epyrupszm7khk6weq5lrlyt52lg48ucew',
    args: '0x758d311c8483e0602dfad7b69d9053e3f917457d'
  },
  #...
]
Step 3: Run the Example
Navigate to your project, install the node dependencies, and start running the example:
- Command
- Response
npm install && NETWORK=devnet npm start
$ parcel index.html
Server running at http://localhost:1234
✨ Built in 66ms
Now, the app is running in http://localhost:1234
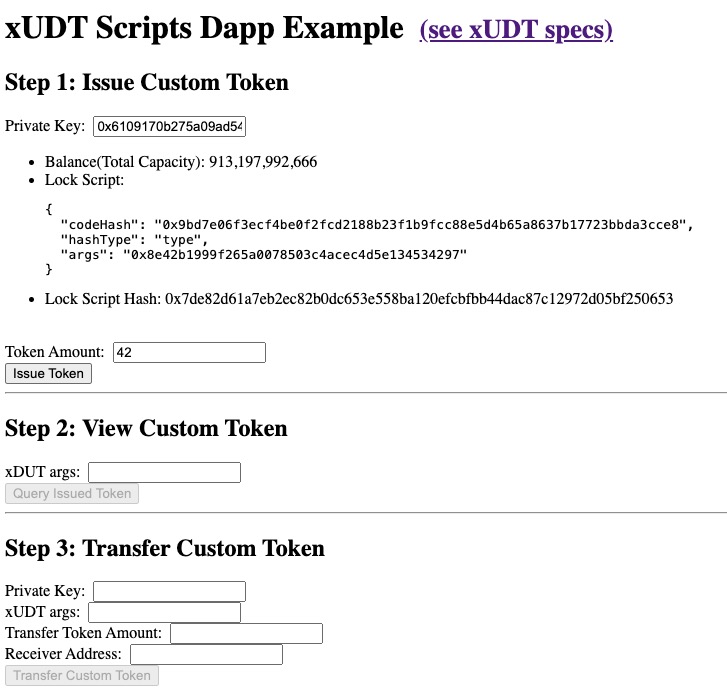
Behind the Scenes
Issuing Custom Token
Open the lib.ts file in your project and check out the IssueToken function:
export async function issueToken(privKey: string, amount: string) {
  const signer = new ccc.SignerCkbPrivateKey(cccClient, privKey);
  const lockScript = (await signer.getAddressObjSecp256k1()).script;
  const xudtArgs = lockScript.hash() + "00000000";

  const typeScript = await ccc.Script.fromKnownScript(
    signer.client,
    ccc.KnownScript.XUdt,
    xudtArgs
  );
  ...
}
This function accepts two parameters:
privKey: The private key of the issueramount: The amount of tokens
Note that we aim to create an output Cell whose Type Script is an xUDT Script. The args of this xUDT Script are the issuer's Lock Script Hash, which is why we include the following lines of code:
const lockScript = (await signer.getAddressObjSecp256k1()).script;
const xudtArgs = lockScript.hash() + "00000000";
Also, note that the 00000000 here is just a placeholder. To unlock more capabilities of the xUDT Script, this placeholder can contain specific data. However, we don't need to concern ourselves with this detail at the moment.
Further down in the function, you'll see that the complete target output Cell of our custom token appears as follows:
const tx = ccc.Transaction.from({
  outputs: [{ lock: lockScript, type: typeScript }],
  outputsData: [ccc.numLeToBytes(amount, 16)],
});
Note that the outputsData field is the amount of the custom token.
Next, to complete our issueToken function, we just use the helpers.TransactionSkeleton to build the transaction with our desired output Cells.
  await tx.addCellDepsOfKnownScripts(signer.client, ccc.KnownScript.XUdt);
  // additional 0.001 ckb for tx fee
  // Complete missing parts for transaction
  await tx.completeInputsByCapacity(signer);
  await tx.completeFeeBy(signer, 1000);

...
Lastly, we do the signing and sending of the transaction:
const txHash = await signer.sendTransaction(tx);
console.log("The transaction hash is", hash);
Token Info & Holders
Since we have issued a custom token, the next step will be checking out this token and viewing its holders. To do that, we write a queryIssuedTokenCells in the lib.ts file:
export async function queryIssuedTokenCells(xudtArgs: HexString) {
  const typeScript = await ccc.Script.fromKnownScript(
    cccClient,
    ccc.KnownScript.XUdt,
    xudtArgs
  );

  const collected: ccc.Cell[] = [];
  const collector = cccClient.findCellsByType(typeScript, true);
  for await (const cell of collector) {
    collected.push(cell);
  }
  return collected;
}
Note that to query a custom token Cell, we must know its xUDTArgs. As explained in the high-level ideas for xUDT Scripts, this xUDTArgs functions like the unique ID for the token you issued.
Thus, queryIssuedTokenCells will accept only one parameter: xudtArgs. We then construct a Type Script with this xudtArgs and use cccClient.findCellsByType(typeScript, true); to query the Live Cells that possess such a Type Script.
By identifying the Lock Scripts of these Live Cells, we can determine that those custom tokens now belong to the individual who can unlock this Lock Script. Consequently, we know who the token holders are.
Transfer Custom Token
The next step you want to do is probably sending your tokens to someone else. To do that, you will replace the Lock Script of the custom token Cell with the receiver's Lock Script. Therefore, the receiver can unlock the custom token Cell. In this way, the token is transferred from you to other people.
Check out the transferTokenToAddress function in lib.ts file.
export async function transferTokenToAddress(
  udtIssuerArgs: string,
  senderPrivKey: string,
  amount: string,
  receiverAddress: string,
){
  ...
}
The function use udtIssuerArgs to build the Type Script from the custom token. It then collects Live Cells which match the Type Script and the Lock Script of the senderLockScript, effectively saying, "give me the custom token Cells that belong to the sender (the sender can unlock the Lock Script).".
With all these Live Cells, we can build the transaction to produce custom token Cells with the required amount and the receiver's Lock Scripts from the input Cells.
const signer = new ccc.SignerCkbPrivateKey(cccClient, senderPrivKey);
const senderLockScript = (await signer.getAddressObjSecp256k1()).script;
const receiverLockScript = (
  await ccc.Address.fromString(receiverAddress, cccClient)
).script;

const xudtArgs = udtIssuerArgs;
const xUdtType = await ccc.Script.fromKnownScript(
  cccClient,
  ccc.KnownScript.XUdt,
  xudtArgs
);

const tx = ccc.Transaction.from({
  outputs: [{ lock: receiverLockScript, type: xUdtType }],
  outputsData: [ccc.numLeToBytes(amount, 16)],
});
await tx.completeInputsByUdt(signer, xUdtType);
Notice that if there is any token amount remaining, we need to return the change amount along with change capacities to the sender.
const balanceDiff =
  (await tx.getInputsUdtBalance(signer.client, xUdtType)) -
  tx.getOutputsUdtBalance(xUdtType);
console.log("balanceDiff: ", balanceDiff);
if (balanceDiff > ccc.Zero) {
  tx.addOutput(
    {
      lock: senderLockScript,
      type: xUdtType,
    },
    ccc.numLeToBytes(balanceDiff, 16)
  );
}
await tx.addCellDepsOfKnownScripts(signer.client, ccc.KnownScript.XUdt);

// Complete missing parts for transaction
await tx.completeInputsByCapacity(signer);
await tx.completeFeeBy(signer, 1000);

const txHash = await signer.sendTransaction(tx);
Congratulations!
After following this tutorial, you have mastered how custom tokens work on CKB. Here's a quick recap:
- Create a CKB transaction containing a xUDT Cell in the outputs
- The data of the xUDT Cell contains the amount number of the token
- Query the custom token Cell by passing the Lock Script Hash of the token issuer
- Transfer tokens to another account by replacing the Lock Script.
Next Step
Now that your dApp works great on the local blockchain, you might want to switch it to different environments like Testnet or Mainnet.
To do that, simply change the NETWORK environment variable to testnet:
export NETWORK=testnetThen restart the dApp. It should connect to the Testnet automatically.
For more details, check out the full source code.
Additional Resources
- xUDT High-Level Explanation
- xUDT specs: RFC-0052-extensible-udt
- sUDT specs: RFC-0025-simple-udt
- CKB transaction structure: RFC-0022-transaction-structure
- CKB data structure basics: RFC-0019-data-structure